

Tutorials & How-To Guides
QUICK ANSWER
One salon. Individual schedules. One booking page.
Add your team, build your service menu, assign eligible staff, and save each person’s availability. Then review your booking rules and payments, publish your services, and test the customer journey.
A client wants a haircut on Tuesday afternoon. They have a favourite stylist, but they would try someone else if it means getting an earlier appointment. Your booking page needs to handle both choices while respecting everyone’s hours, services, and existing appointments.
To set up online bookings for a salon with multiple staff, add your team, create your service menu, assign the right people to each service, and save each person’s availability. Then configure your booking rules, publish the services, and test the customer journey before sharing your link.
This guide walks through that process in ClimbCal, using Glow Beauty Studio, a fictional salon demo with three staff members and three services.
The four screenshots below are real captures of ClimbCal. The demo uses fictional staff profiles and zero prices so visitors can explore it without paying. Enter your salon’s actual prices when setting up your own services.
1. Add everyone who will take appointments
Start with the people who deliver your services. In ClimbCal, managing Services requires an active Advanced plan and an owner or admin role. Your workspace also needs enough purchased seats for its active members.
Open Team, enter your teammate’s email address, choose their role, and select Send invitation. Have each person accept their invitation before you assign them to services.
Give each person their own membership and schedule. This lets you represent different shifts and decide which services they can provide. A new stylist might take haircuts and consultations, while another team member also offers facials.
2. Build a clear service menu
Open Services → New service. Add a customer-facing title, public description, and location. A category and service image can help clients browse your menu.
Use names that tell clients what they are booking. “Signature Cut & Finish” is more useful than “Appointment,” and a short description can explain what is included or when to choose a longer option.
Under Pricing, set the currency, duration, public label, and full price for each option. Select Add duration if the same service needs more than one appointment length.
For example, the demo’s haircut service offers a 45-minute Signature refresh and a 60-minute Full restyle. Your salon can give each duration its own price. Set the length to reflect the time the client actually needs with the stylist.
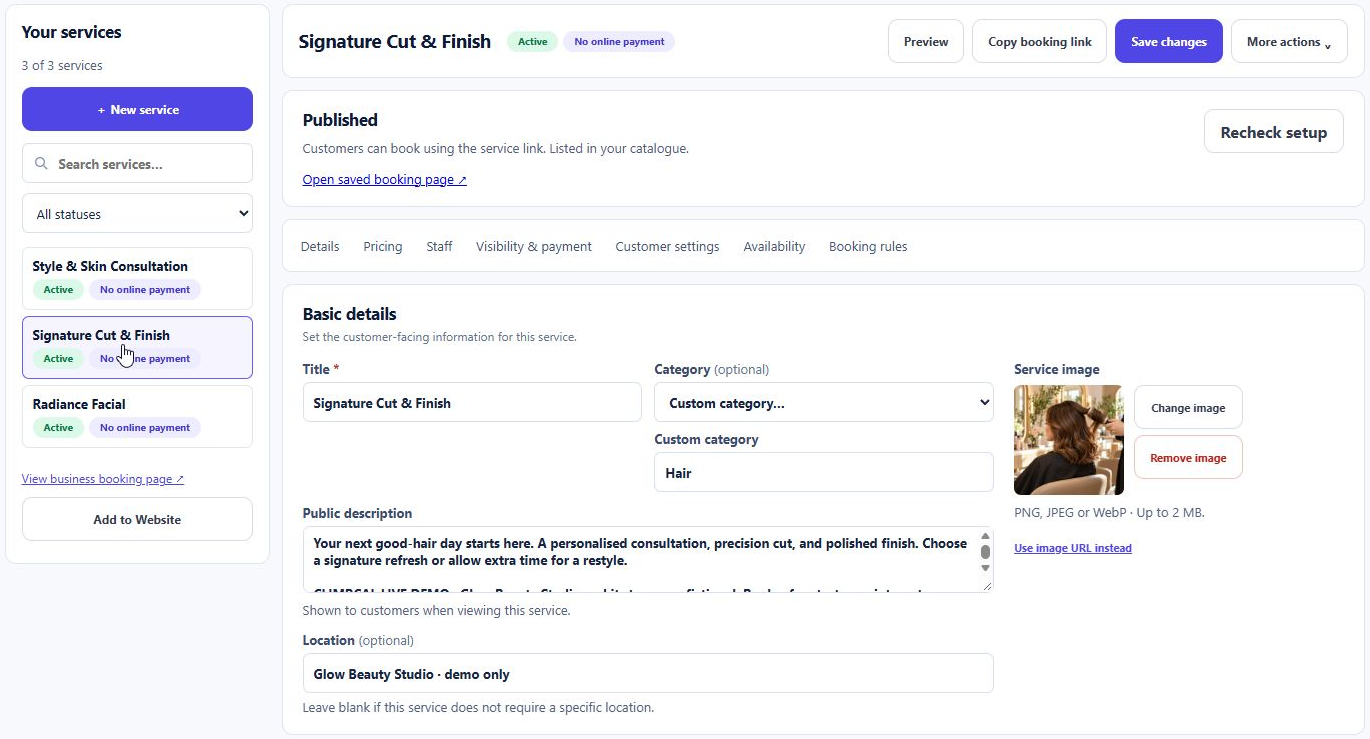
Screenshot 1: Create each salon service with clear details that help clients choose the right appointment.
3. Assign the right staff to each service
Open the service’s Staff section. Under Eligible staff, select only the people who can deliver that service. Review this separately for every service; someone who offers haircuts should not automatically receive facial appointments.
Use Edit profile beside each person to set their public name, biography, and optional photo. Approve the name, enable Customers can select this staff member when needed, and select Save profile. Profile changes are saved separately and apply across services.
Next, choose How customers choose staff:
- Customer chooses staff: clients select a particular person.
- Automatic assignment: ClimbCal assigns an eligible, available person.
- Customer chooses or Any available: clients choose a favourite or leave the assignment to ClimbCal.
The third option works well when you want to support both returning clients and people looking for an available appointment. “Any available” considers the staff assigned to that service; it does not make every person in the salon eligible.
You can also change Staff term to a word that suits your business, such as “stylist,” “therapist,” or “specialist.”
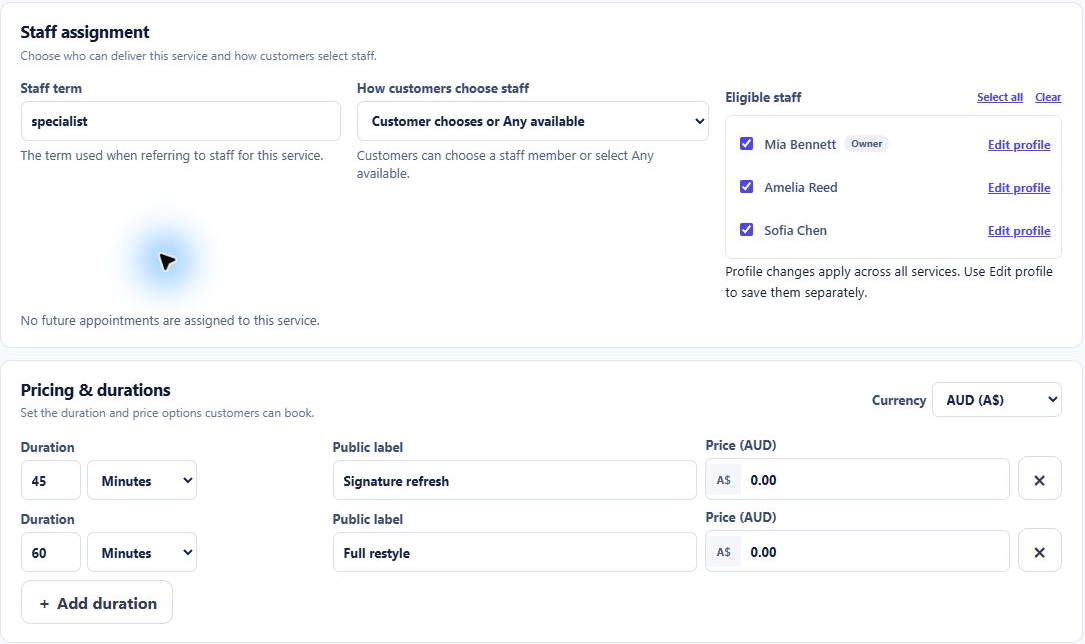
Screenshot 2: Choose eligible staff and let clients book a named specialist or select Any available. The zero prices shown belong to the free demo.
4. Save each staff member’s working hours
Your salon’s opening hours may be 9 am to 6 pm, but that does not mean every stylist works that entire day.
Open Team → Manage availability beside each person. Choose the correct timezone, add their weekly hours, and select Save availability. Use separate intervals to leave a gap for lunch or another regular break.
In the demo, Sofia’s Monday hours run from 10 am to 6 pm, while Mia starts at 9 am. Those different schedules should produce different appointment choices for clients.
Use Date overrides for a one-off change, such as a blocked day or replacement hours. The team availability editor also has Block dates for a range of full-day absences.
If a staff member has commitments in a connected calendar, review their calendar connection and conflict settings too. After changing staff availability, return to the service and select Recheck setup.
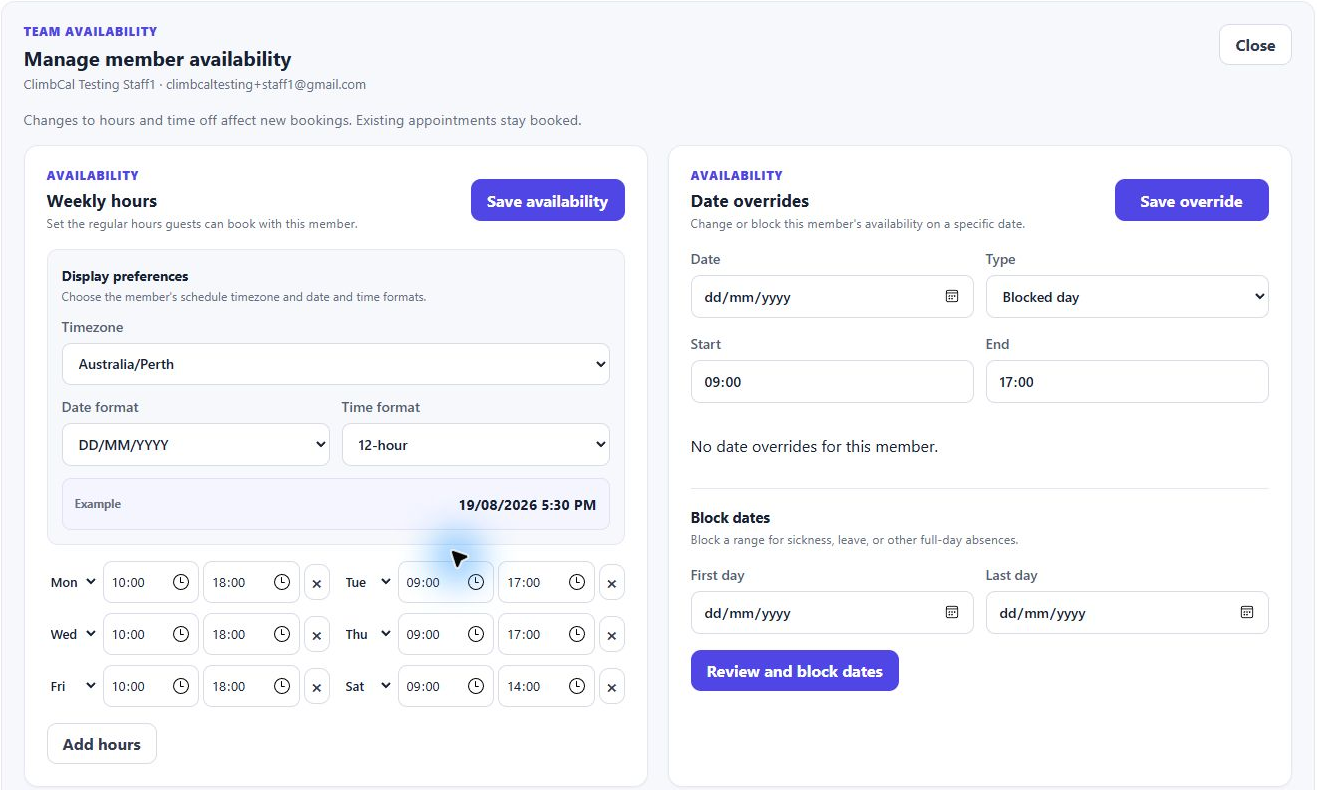
Screenshot 3: Save a separate schedule for each team member, then use overrides or blocked dates for exceptions.
5. Add buffers, booking limits, and customer settings
Open the service’s Booking rules and review the start interval, minimum notice, booking window, and buffers.
A 45-minute haircut with a 10-minute buffer after it needs 55 minutes of staff time. The client receives the 45-minute service, and the extra time gives the stylist space to clean up and prepare. A 15-minute start interval controls which starting times can be offered; it does not shorten the appointment.
Choose a minimum notice period you can reliably manage and decide how far ahead clients may book. Add an optional daily booking limit if needed.
Under Customer settings, add a cancellation policy, choose whether to collect a phone number, and include any useful intake questions. You can also enable Send 24-hour email reminder.
Leave service Availability overrides empty if each person’s normal working hours are sufficient. Service-specific hours restrict when that service is offered; they do not extend a staff member’s own availability.
6. Choose payment settings and publish
Under Visibility & payment, enable Show in service catalogue for services you want clients to find on your business booking page.
Choose No online payment, Deposit, or Full payment. Deposits and full payments require a connected Stripe account with its account requirements completed. For a deposit, check the amount against every duration’s full price and explain how the remaining balance will be paid.
Select Preview to review the customer-facing details. Preview can include unsaved edits, so save your work before treating the live page as finished.
Use Recheck setup and resolve any issues with staff, profiles, availability, pricing, or payments. When the service is Ready to publish, select Publish. Repeat for the rest of your menu.
7. Test the booking journey as a client
Open View business booking page and choose a service. Check the duration options, select a named staff member, and choose a future date. Then compare the choices with Any available.
The screenshot below shows Sofia selected for the demo’s 45-minute haircut, with Monday appointments starting at 10 am, matching her saved working hours.
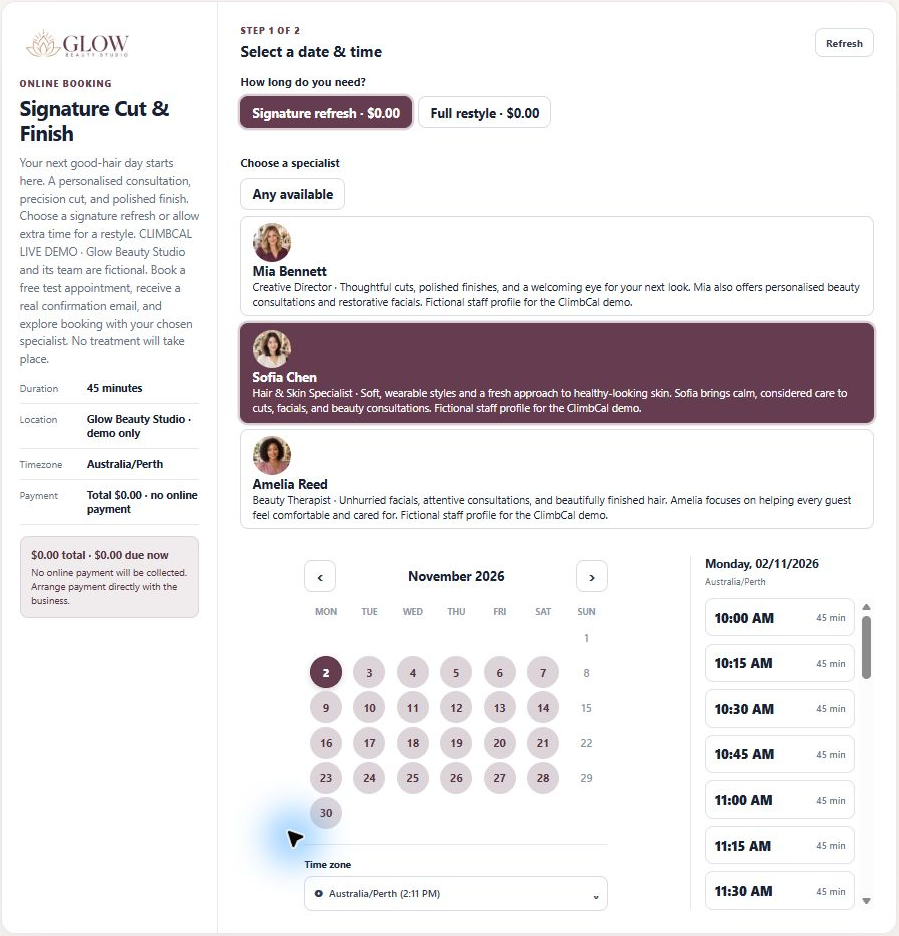
Screenshot 4: Clients choose a duration and specialist, then see available times for their selection.
Before launching, make a controlled test booking using an email address you own. Check that the service, duration, assigned staff member, timezone, and any payment amount are correct. Confirm that the appointment appears in Bookings and that the confirmation email arrives.
Also check that the same person cannot be booked for an overlapping appointment through another service. Review cancellation and rescheduling links, and test the page on a phone.
If a published service shows no times, check staff eligibility and profiles first, then weekly hours, date overrides, calendar conflicts, notice periods, booking windows, and buffers.
More guides for your salon
Compare salon booking software costs, or learn how to add a Book Now button to WordPress.
EXPLORE THE SALON DEMO
See staff selection in action
Explore the fictional Glow Beauty Studio booking page and choose a specialist or Any available.
Try the salon demo →Services setup requires an active Advanced plan and enough seats for your team.