
Tutorials & How-To Guides
QUICK ANSWER
Create your booking page. Copy its link. Add a button.
Use WordPress’s Buttons block or Elementor’s Button widget to link to a free ClimbCal booking page. No booking plugin or custom code is required.
Want to let customers book appointments directly from your WordPress website? Adding a Book Now button is one of the easiest ways to turn website visitors into paying customers.
Whether you're a consultant, personal trainer, tutor, beauty professional, or small business owner, a booking button gives customers a quick and convenient way to schedule an appointment without sending emails or calling your business.
The best part? You don't need to install a WordPress booking plugin, write any code, or hire a developer.
With ClimbCal, you can create a free online booking page and connect it to any button on your WordPress website.
In this guide, we'll show you how to do it in a few simple steps, including instructions for websites built with Elementor.
What is a Book Now button?
A Book Now button is a clickable button on your website that takes visitors to an online appointment booking page.
Instead of asking customers to fill out a contact form and wait for a response, you allow them to choose an available date and time themselves.
For example, a business website might feature a button saying:
Book a Free Consultation
When a visitor clicks it, they're taken to a booking page where they can:
- View available appointment dates and times.
- Select a time that suits them.
- Enter their contact details.
- Confirm their appointment.
With ClimbCal, you manage your appointment types, working hours, and bookings from one dashboard.
Your WordPress website simply directs customers to your booking page.
Why add a booking button to your website?
If customers visit your website outside business hours, they may not be able to call or receive an immediate response to an enquiry.
An online booking button removes that obstacle.
Here are some of the benefits:
- Accept bookings 24/7: Customers can schedule appointments even when you're not working.
- Reduce back-and-forth communication: No more exchanging multiple emails to agree on a meeting time.
- Make booking easier: Customers can see your available times and make a booking in just a few steps.
- Avoid unnecessary WordPress plugins: Your scheduling system runs independently from your website.
- Make your website more actionable: Give visitors a clear next step when they're ready to contact your business.
And because you're simply adding a link to your website, the approach works with most WordPress themes and page builders.
Step 1: Create your free ClimbCal booking page
Before adding a Book Now button, you need somewhere for that button to take your customers.
ClimbCal lets you create a personalised booking page that displays your available appointment times.
You can get started with a free ClimbCal account.
Once you've signed in:
- Open Event types from the left-hand menu.
- Click New event type.
- Enter a title for your appointment, such as Free Consultation or Initial Appointment.
- Add a description explaining what customers can expect.
- Configure the appointment duration in the Scheduling section.
- Open Availability to set your working hours.
- Change your event status to Active when you're ready to accept bookings.
- Click Save event type.
That's it. You now have an appointment type that customers can book online.
Example: If you're a consultant offering free 30-minute discovery calls, you can create an event called Free 30-Minute Consultation and configure your available hours.
Customers will only be offered appointment times based on your configured availability.
Step 2: Copy your booking page link
Now that you've created your appointment, you'll need its public booking URL.
In your ClimbCal dashboard:
- Open Event types.
- Select the appointment you want to promote from Current event.
- Open the Basic details section.
- Find the Customer booking page area.
- Click Copy link.
Your booking URL is now ready to be added to your website.
You can also click Open booking page to preview what your customers will see.
Tip: Open the link in a private browser window to make sure the booking page is accessible without being signed in to ClimbCal.
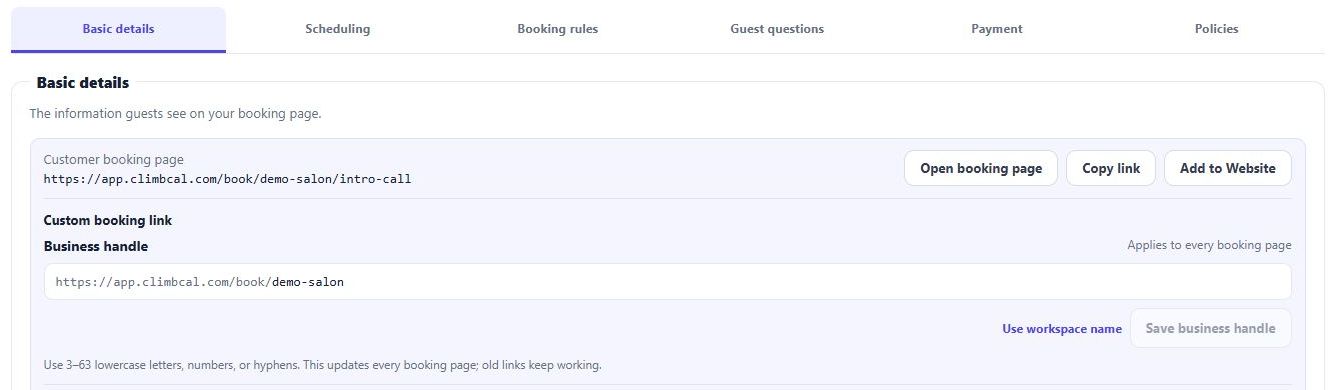
In ClimbCal, open Basic details and choose Copy link in the Customer booking page area. Use your own event’s URL and make sure the event is Active before sharing it.
Step 3: Add a Book Now button to WordPress
There are several ways to add a booking button, depending on how your WordPress website was built.
We'll cover the two most common options.
Option A: Add a Book Now button using the WordPress Block Editor
If your website uses the standard WordPress editor (Gutenberg), you can add a booking button using the built-in Buttons block.
Here's how:
- Log in to your WordPress dashboard.
- Go to Pages and open the page where you want the booking button to appear.
- Click the + button to add a new block.
- Search for Buttons and insert the block.
- Enter your button text, such as Book Now or Book a Consultation.
- Select the button and click the link icon in the toolbar.
- Paste the booking page URL you copied from ClimbCal.
- Apply the link.
- Customise the button's colour, size, and alignment to match your website.
- Click Update or Publish.
Your booking button is now ready.
Visitors can click it to access your ClimbCal booking page.
You can also use the same process to place a booking button at the bottom of a service description, within a landing page, or inside a blog article.
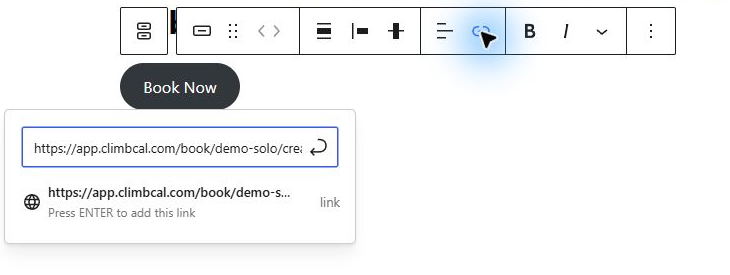
Select your WordPress Button block, open the link control, paste your ClimbCal booking URL and apply the link. The URL shown is an example.
Option B: Add a Book Now button using Elementor
If your WordPress website was built with Elementor, adding a booking button is straightforward.
- Open the page you want to edit from your WordPress dashboard.
- Click Edit with Elementor.
- Search for the Button widget in the Elementor panel.
- Drag the widget into your preferred location.
- Under the Content tab, change the button text to Book Now, Schedule an Appointment, or something relevant to your service.
- In the Link field, paste your ClimbCal booking URL.
- Open the Style tab to customise the button's typography, background colour, borders, and spacing.
- Click Publish or Update.
You can also choose whether the booking page opens in the same browser tab or a new one.
For most websites, opening the booking page in the same tab creates a straightforward user experience.
Design tip: Make your booking button stand out from the surrounding content, but keep its colour and style consistent with the rest of your website.
Using Elementor’s newer atomic Button element? Open General → Settings → Link. The screenshot below shows this interface; the classic widget uses Content → Link.
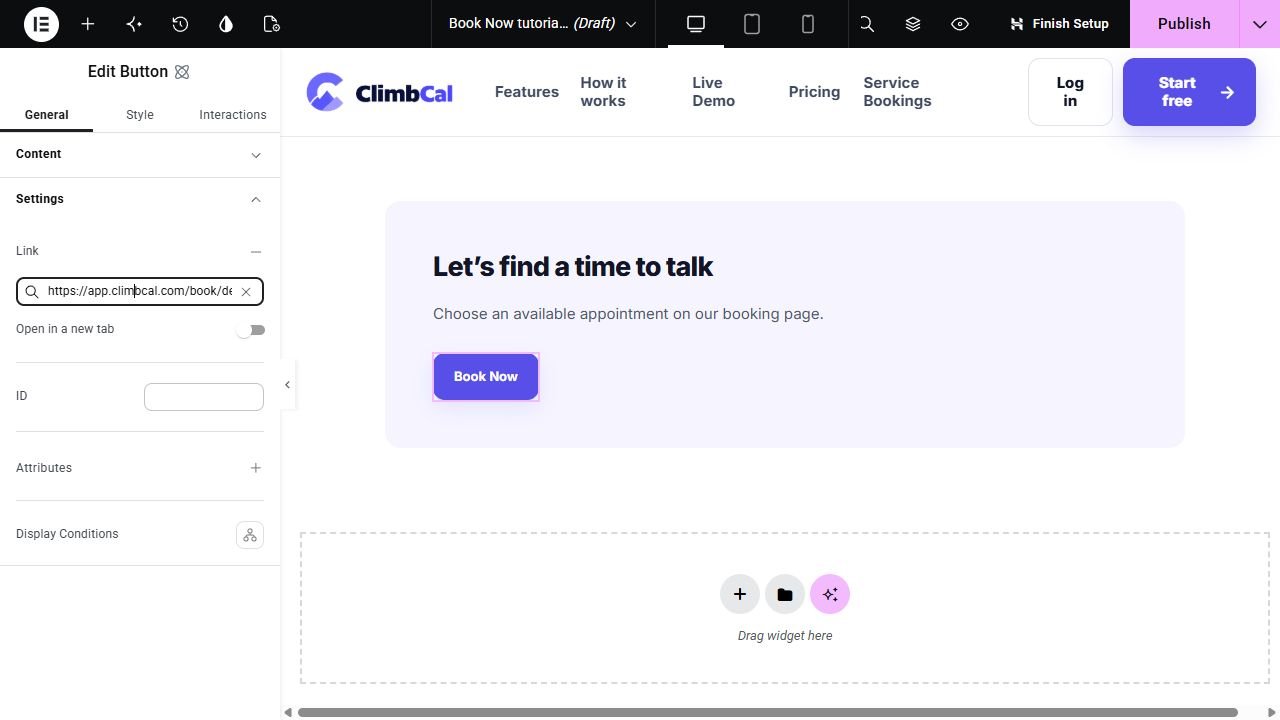
The Elementor Button settings show the Link URL field and the Book Now button on the page. Paste your own ClimbCal booking URL.
Step 4: Add your booking button to your website header
A booking button doesn't have to appear only on individual pages.
For businesses where appointments are a primary goal, the website header is often one of the most useful locations.
A prominent Book Now button in your navigation makes it easy for customers to find your booking page, regardless of which page they're visiting.
If you're using Elementor
If you have access to Elementor's Theme Builder:
- Open Templates → Theme Builder.
- Edit your website's Header template.
- Add a Button widget to the header.
- Enter Book Now as the button text.
- Paste your ClimbCal booking page URL.
- Style the button to match your header and publish your changes.
If you're using the standard WordPress editor
The process depends on your theme.
For a block theme, open Appearance → Editor, edit the Header template part, and add a Button block or a Navigation link pointing to your ClimbCal booking page.
For a classic theme, you can usually add a booking link through Appearance → Menus. Some themes also provide options for styling a navigation item as a button.
Tip: Don't forget to check your mobile navigation. A Book Now button that's clearly visible on desktop but hidden on mobile may cause you to miss potential bookings.
Step 5: Test your booking button
Before making your new booking button available to customers, test the complete experience.
Open your website in a private browser window and click the button.
Check that:
- The button points to the correct ClimbCal booking page.
- The booking page loads without requiring a login.
- Your appointment is visible and marked as available.
- Customers can choose a suitable date and time.
- The page works properly on a mobile phone.
- A test appointment can be completed and appears in your ClimbCal dashboard.
If you've connected a calendar to ClimbCal, check that the booking is reflected as expected.
Once testing is complete, remove or cancel your test appointment as appropriate.
Where should you place your Book Now button?
The position of your button can make a difference to how many visitors decide to book.
Rather than putting it in only one location, consider making booking accessible at several natural points across your website.
Homepage
Place a prominent booking button near the top of your homepage, ideally alongside a short description of your main service.
For example: Book a Free Consultation
Services pages
If your business offers several services, add a relevant booking button to each service page.
For example:
- Personal trainer: Book a Training Session
- Tutor: Schedule a Lesson
- Business consultant: Book a Discovery Call
- Beauty professional: Book an Appointment
- Accountant: Schedule a Consultation
You can create different ClimbCal Event Types and link each button to the appropriate appointment.
Website header
A booking button in the header makes it accessible from multiple pages.
Contact page
Give visitors the option to book directly instead of submitting a traditional contact form.
You can still keep your email address and contact form for general enquiries.
Mobile website
Make sure your booking button is easy to tap and clearly visible on smaller screens.
Best practice: Use descriptive wording. Book a Free Consultation often communicates more clearly than a generic Click Here button because customers know exactly what will happen.
Should you use a booking button or embed a booking calendar?
Both approaches can work well, but they serve slightly different needs.
Feature
Book Now button
Embedded booking calendar
Setup difficulty
Very easy
Easy
Coding required
No
No manual coding; uses generated HTML
Where booking happens
ClimbCal booking page
Inside your website
Works with WordPress
Yes
Yes
Works with Elementor
Yes
Yes
ClimbCal Free plan
Yes
No
Best for
Fast, simple setup
Integrated website experience
Plan check: ClimbCal Free supports sharing booking links, with one active event type, one calendar connection and up to 10 confirmed bookings per month. Website embedding is available on Standard, Advanced and Lifetime. Compare current plans.
If your goal is to start accepting bookings quickly, a Book Now button is an excellent starting point.
If you'd prefer customers to complete the entire booking process without leaving your website, you can embed the ClimbCal booking experience directly into a WordPress page using the HTML code generated by ClimbCal.
For more information, read our related tutorial: How to Add Online Booking to Your WordPress Website.
Frequently asked questions
Can I add a Book Now button to WordPress for free?
Yes. WordPress includes a built-in Buttons block, and ClimbCal offers a Free plan that lets you create and share a public booking page.
You can connect the two without purchasing a dedicated WordPress booking plugin.
Do I need Elementor Pro to add a booking button?
No. Elementor's Button widget is available without Elementor Pro.
However, editing site-wide headers through Elementor's Theme Builder requires access to the appropriate Elementor Pro functionality.
Can I use different booking buttons for different services?
Yes. You can create separate ClimbCal Event Types for different appointments and link each button to its corresponding booking page, subject to your plan's event limits.
Can I add a booking button to my WordPress navigation menu?
Yes. You can add a custom link pointing to your ClimbCal booking page. Depending on your WordPress theme, you may also be able to style it as a prominent button.
Will customers need a ClimbCal account to book?
No. Customers can access your public booking page and make an appointment without creating a ClimbCal account.
Can I change my availability after adding the button?
Yes. Your website button links to your ClimbCal booking page, so you can manage your availability and scheduling settings from the ClimbCal dashboard without editing your WordPress button every time your working hours change.
Start accepting appointments from your WordPress website
Adding a Book Now button is one of the simplest ways to make your WordPress website more useful to potential customers.
You don't need to install complicated plugins, manage booking functionality inside WordPress, or build a scheduling system from scratch.
With ClimbCal, you can create your booking page, configure your availability, and add the booking link to your website in just a few steps.
And if your business grows, you can explore more advanced features, including additional appointment types, team scheduling, online payments, and embedded booking pages on eligible plans.
Ready to give it a try?
Get started with ClimbCal and create your online booking page.
Or try our interactive demo to see how the booking experience works from your customers' perspective.
Editor references: WordPress Buttons block and Elementor Button widget. Screenshots captured from ClimbCal and draft WordPress/Elementor examples.
START FOR FREE
Your next booking starts with a link
Create your booking page and connect it to your WordPress button.
Get started with ClimbCal →